Smartyでお手軽簡単なんちゃってCMS
5~6ページのホームページで、ブログやお知らせを書きたいなどの要望が無い、静的HTMLでも十分な場合は、MovableTypeやWordPressといったCMSを設置するのも億劫です。ですが、静的HTMLだとヘッダーやフッターに変更があった場合はちょっと面倒です。Dreamweaverのテンプレートを使うって手も有りますが、Smartyを使った方法をご紹介致します。
Smartyテンプレートを作成し、フォルダーにアップロードしておけば、勝手に表示してくれるというもの。
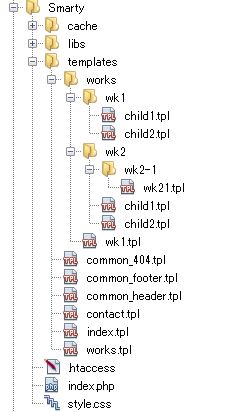
例えば、contact.tplはhttp://xxxx.xxxx/contact.htmlで表示されるという仕組みです。
セットアップ
セットアップといっても、とりえあえずダウンロードして設置してみるのが早いと思いますので、どうぞ。
cacheフォルダーはパーミッションを777に変更して下さいね。
注意 Smartyバージョン
ダウンロードしたファイルに同封されているSmartyはバージョン3です。設置サーバーのPHPバージョンが古いと動作しない場合があるので、公式サイトからバージョン2をダウンロードして入れ替えて下さい。一部ファイルの書き変えがあるので、下の方で説明致します。
注意 .htaccess
RewriteEngine on
RewriteCond %{HTTP:Authorization} ^(.*)
RewriteRule ^(.*) - [E=HTTP_AUTHORIZATION:%1]
#RewriteBase /
RewriteCond %{REQUEST_FILENAME} !-f
RewriteCond %{REQUEST_FILENAME}/index.php !-f
RewriteCond %{REQUEST_FILENAME}/index.html !-f
RewriteCond %{REQUEST_FILENAME}/index.htm !-f
RewriteCond %{REQUEST_URI} !/index.php/
RewriteRule ^(.*)$ index.php?templates=$1 [QSA,L]
RewriteBaseをコメントアウトしていますが、サーバーによってはこれを有効にし、設置場所を設定する必要が有ります。例えばサンプルの場合は以下のような感じです。
RewriteBase /Sample/smartycms
index.phpの解説
<?php
error_reporting(0);
mb_language("Japanese");
mb_internal_encoding("UTF-8");

//require_once('libs/Smarty.class.php'); //v2x系
require_once('libs/SmartyBC.class.php'); //v3x系

 class SmartyControll {
    var $get;
    var $template_dir;
    var $compile_dir;
    var $SiteMap;

/*
 * 初期設定
 */
    public function __construct(){
      $this-> template_dir    = 'templates/';
      $this-> compile_dir     = 'cache/';
    }

/*
 * $_GETをサニタイズ
 */
    static function textreplace($array){
      if( !is_array($array) ) {
          $array = htmlspecialchars($array , ENT_QUOTES , "UTF-8");
          return $array;
      } else {
         $p=0;
         foreach($array AS $key=>$str){
           if($key)
             $p++;
           if( $p === 0)
             return null;
         }
      }
      $sub_Array = array();
      foreach($array as $key=>$str){
        if( is_array($str) ){
             $sub_Array[$key] = self::textreplace($str);
        }else{
           $str = htmlspecialchars($str , ENT_QUOTES , "UTF-8");
           $sub_Array[$key] = $str;
        }
      }
      return $sub_Array;
    }

/*
 * templateの位置を得る
 */
    static function pramAnalysis($dir,$tpl){
      $array       = explode('/', $tpl);
      $array_last  = $array[count($array) - 1];

      foreach($array AS $str){
        if($array_last == $str){
          $file = explode('.', $str);
          $dir .= $file[0].'.tpl';
          break;
        }else{
          $dir .= $str.DIRECTORY_SEPARATOR;
        }
      }
      if( file_exists($dir) === true )
        return $dir;
        return false;
    }

/*
 * サイトマップ
 * これはtemplateを一覧表示する為の開発用メソッドです
 * 実運用では手作業でサイトマップを生成して下さい
 */
    public function siteMap($dir,&$map){
      $handle = opendir($dir);

      while (false !== ($file = readdir($handle))) {
        $dk_file = $dir.$file;
        if($file != '.' AND $file !='..' AND !preg_match("/common/",$file)){
          if(is_dir($dk_file) === true){
            self::siteMap($dk_file.DIRECTORY_SEPARATOR,$map);
          }else{
            $dk_file = str_replace("tpl","html",$dk_file);
            $arr = explode(DIRECTORY_SEPARATOR, $dk_file);
            unset($arr['0']);
            $map[] = implode("/", $arr);
          }
        }
      }
      closedir($handle);
    }

/*
 * ページ処理
 */
    public function page(){
        $mode       = null;
        $templates  = null;

      //template,cacheフォールダーの位置を設定します
        //$smarty = new Smarty;//v2x系
        $smarty = new SmartyBC();//v3x系
        $smarty-> error_reporting = E_ALL & ~E_NOTICE; //smarty v2.x対策
        $smarty-> template_dir    = $this->template_dir;
        $smarty-> compile_dir     = $this->compile_dir;
        $smarty-> caching         = 2; //キャッシングはご自由に
        $smarty-> cache_lifetime  = 300;

        $this->template_dir = $smarty-> template_dir[0];

      //ホームページのルートを、index.phpを除外して変数に設定します
        $doc_root = $_SERVER["SCRIPT_NAME"];
        $doc_root = str_replace("index.php","",$doc_root);
        $smarty->assign('doc_root', $doc_root);

      //URLを解析して使用するtemplateを探します
        if(isset($this->get) AND isset($this->get['templates']))
          $templates = $this->get['templates'];

          $templates = isset($templates) ? $templates  : 'index.tpl';
          $page_root = self::pramAnalysis($this->template_dir,$templates);
          $templates = str_replace($smarty-> template_dir[0],"",$page_root);

      //サイトマップはページ一覧表示する為の開発用メソッドです
      //↓の★マーク行と共に実運用ではコメントアウトして下さい
          $obj =  new $this;
          $obj->siteMap($this->template_dir,$sitemap);

      //templateが存在しない場合は404のtemplateとします
        if(!$templates) $templates= 'common_404.tpl';

          $this   -> Smarty   = $smarty;
          $smarty -> assign('sitemap', $sitemap); //★
          $smarty -> display($templates);
          $smarty -> display('common_footer.tpl');
        exit;
    }
}

  $obj =  new SmartyControll;
  $obj -> get  = SmartyControll::textreplace($_GET); //パラメータはサニタイズします
  $obj -> page();
Smarty2に入れ替えた場合は、v2x系という部分が二箇所あるので、コメントアウトを外し、v3x系を削除するかコメントアウトして下さい。
解説といってもたいした事はしてないのですが、common_***というテンプレートがヘッダーやフッター、存在しないページの場合に利用されるもので、それ以外のテンプレート名は表示したいページURLと同じもので作成します。
例えば/woks/wk1.tplはhttp://xxx.xxx/works/wk1.htmlで表示されるという感じ。
index.phpは、要求されたURL works/wk1.htmlを表示する為のテンプレート /woks/wk1.tplが存在するかどうかの確認を行い、無ければcommon_404.tplを表示します。
Smarty変数
<!doctype html>
<html>
<head>
<meta charset="utf-8">
<meta name="keywords" content="" />
<meta name="description" content="" />
<title>{$title} お手軽 SmartyCMS</title>
<link href="{$doc_root}style.css" rel="stylesheet" type="text/css">
</head>

<body>
<div id="header">common_header.tpl</div>
<a href="{$doc_root}">HOME</a>
上記はcommon_header.tplですが、{$doc_root}という変数が書かれています。画像やファイルを読み込む場合は、これを頭に付けてルートを通してあげます。
{$title}は各ページテンプレートに設定されているページ名となります。
{include file='common_header.tpl' title='仕事に関して | '}
<div id="contents">
  works.tpl
</div>
こんな感じ。これをページ用ひな形として複製しつつ、HTMLをベタ貼りしていくだけです。
オマケ
トップページにサイトマップが表示されていますが、これは自分がどんなページを作ったのかを一覧表示するオマケの関数で、ページ名が取得出来ませんので、実際のサイトマップとしては使えません。ただ、上手く加工すればGoogleに送信するサイトマップとしては使えるかもしれません。
Smarty使う方が面倒くせぇって方は素直に静的HTMでどうぞ。